SDK quickstart
This page shows you how to create your first Signaling app using Signaling SDK.
Understand the tech
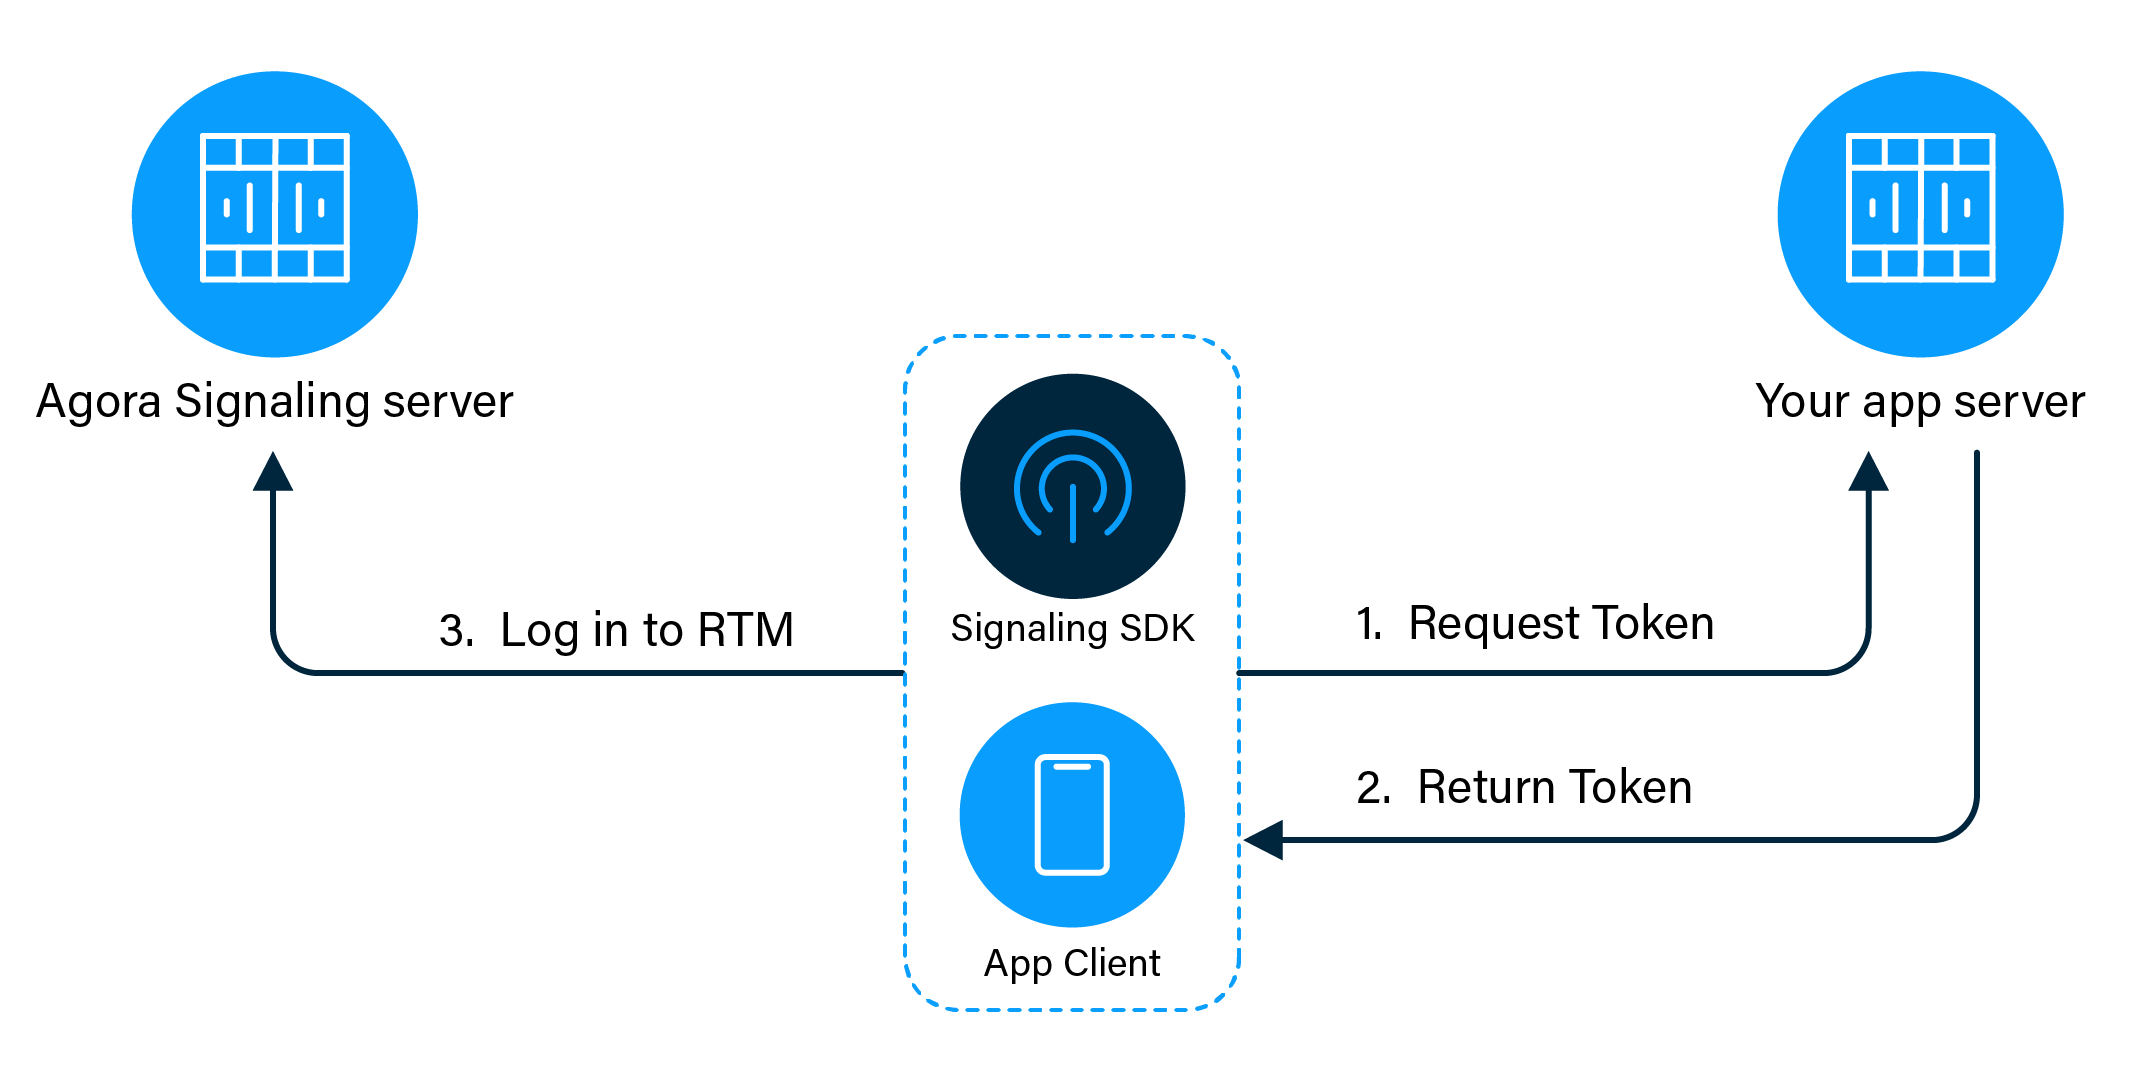
Log in to Signaling

The login process includes:
-
The app client requests a token from your app server.
-
The app server returns the token to the app client.
-
The app client logs in to Signaling with the token.
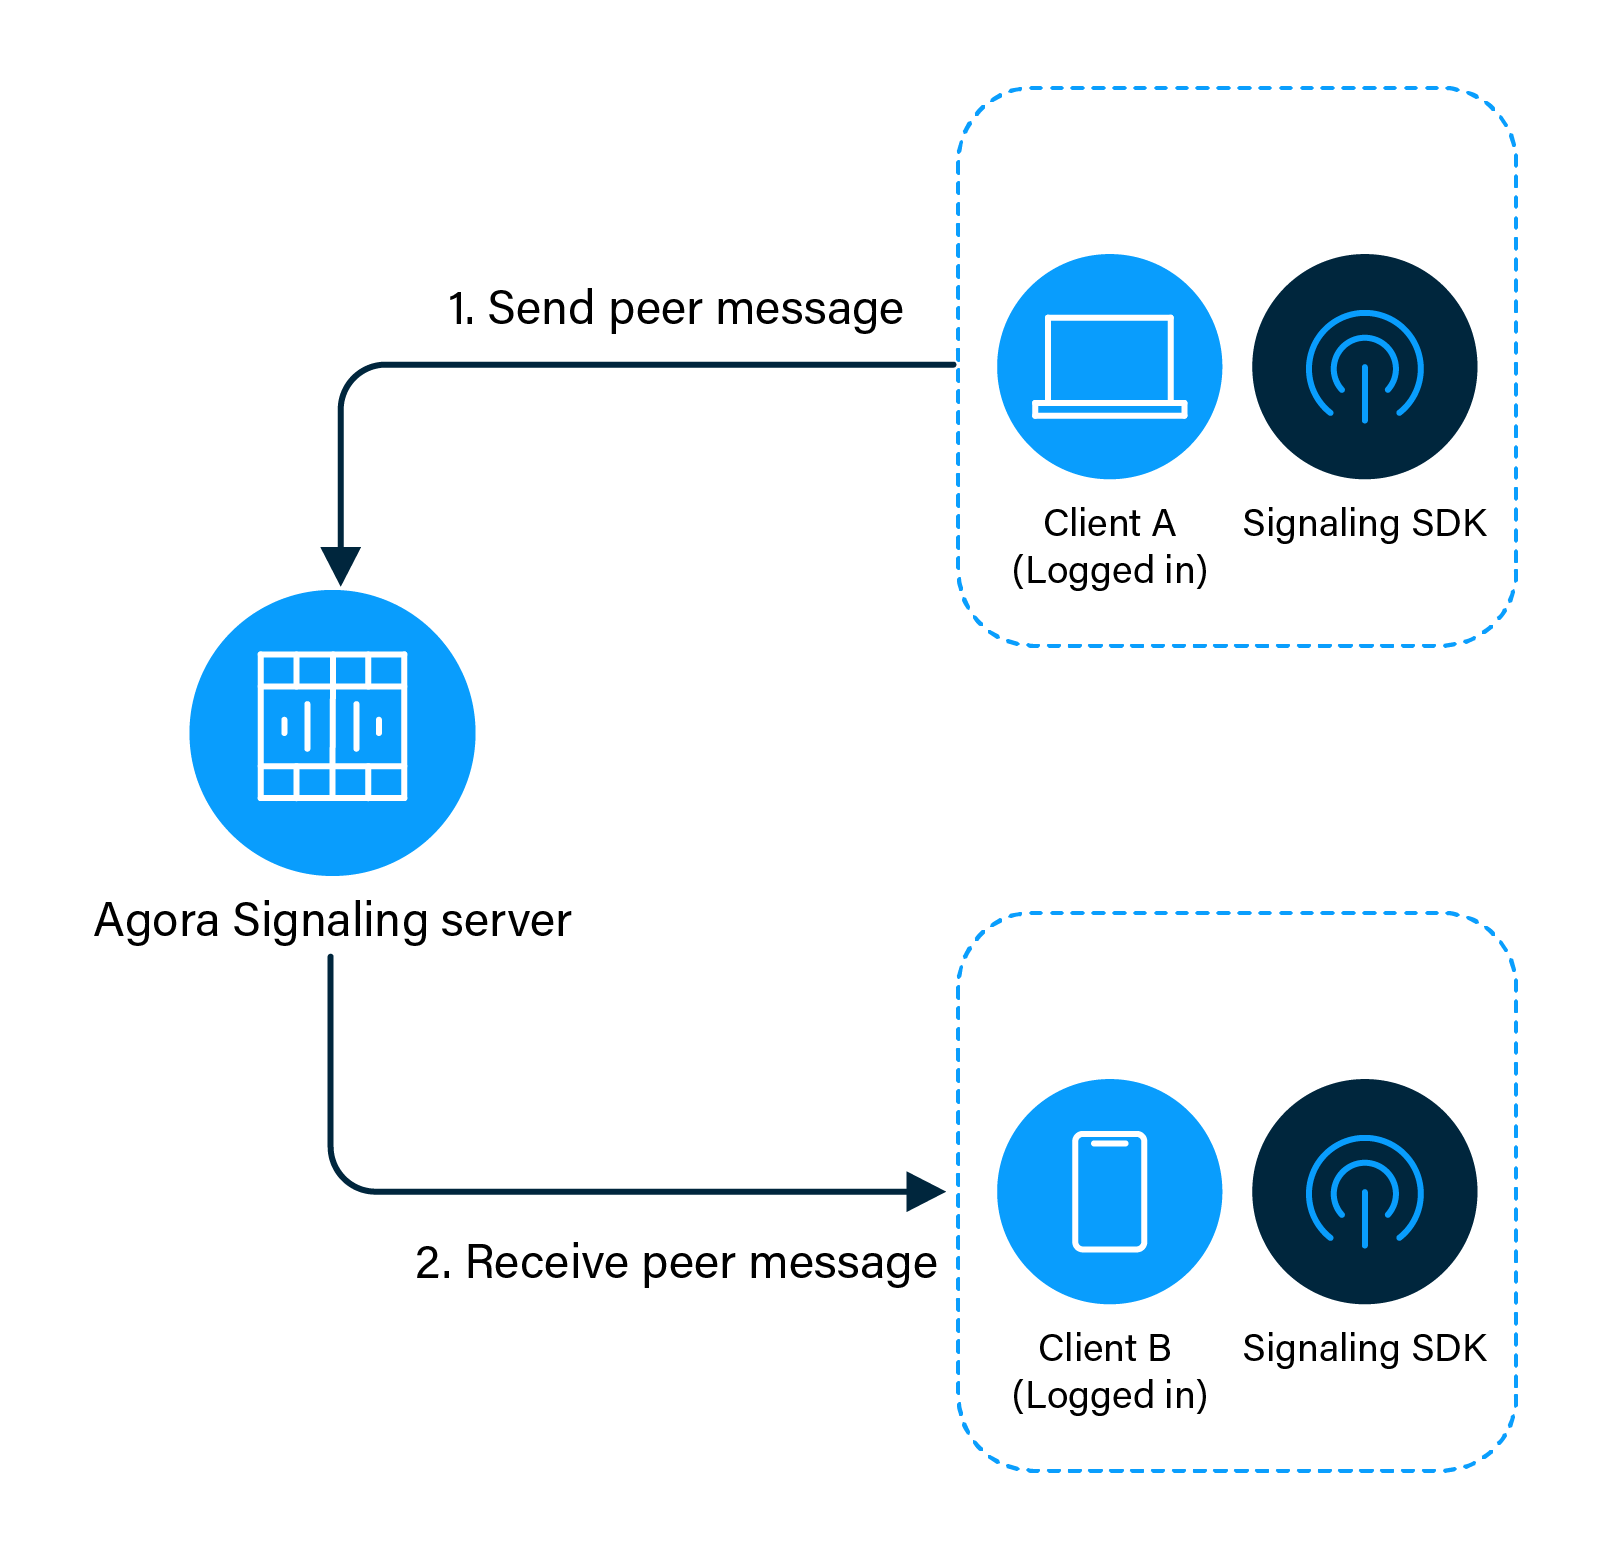
Peer-to-peer messaging

The peer messaging process includes:
-
Client A sends a peer message to Signaling.
-
Signaling sends the message to client B. Client B receives the peer message.
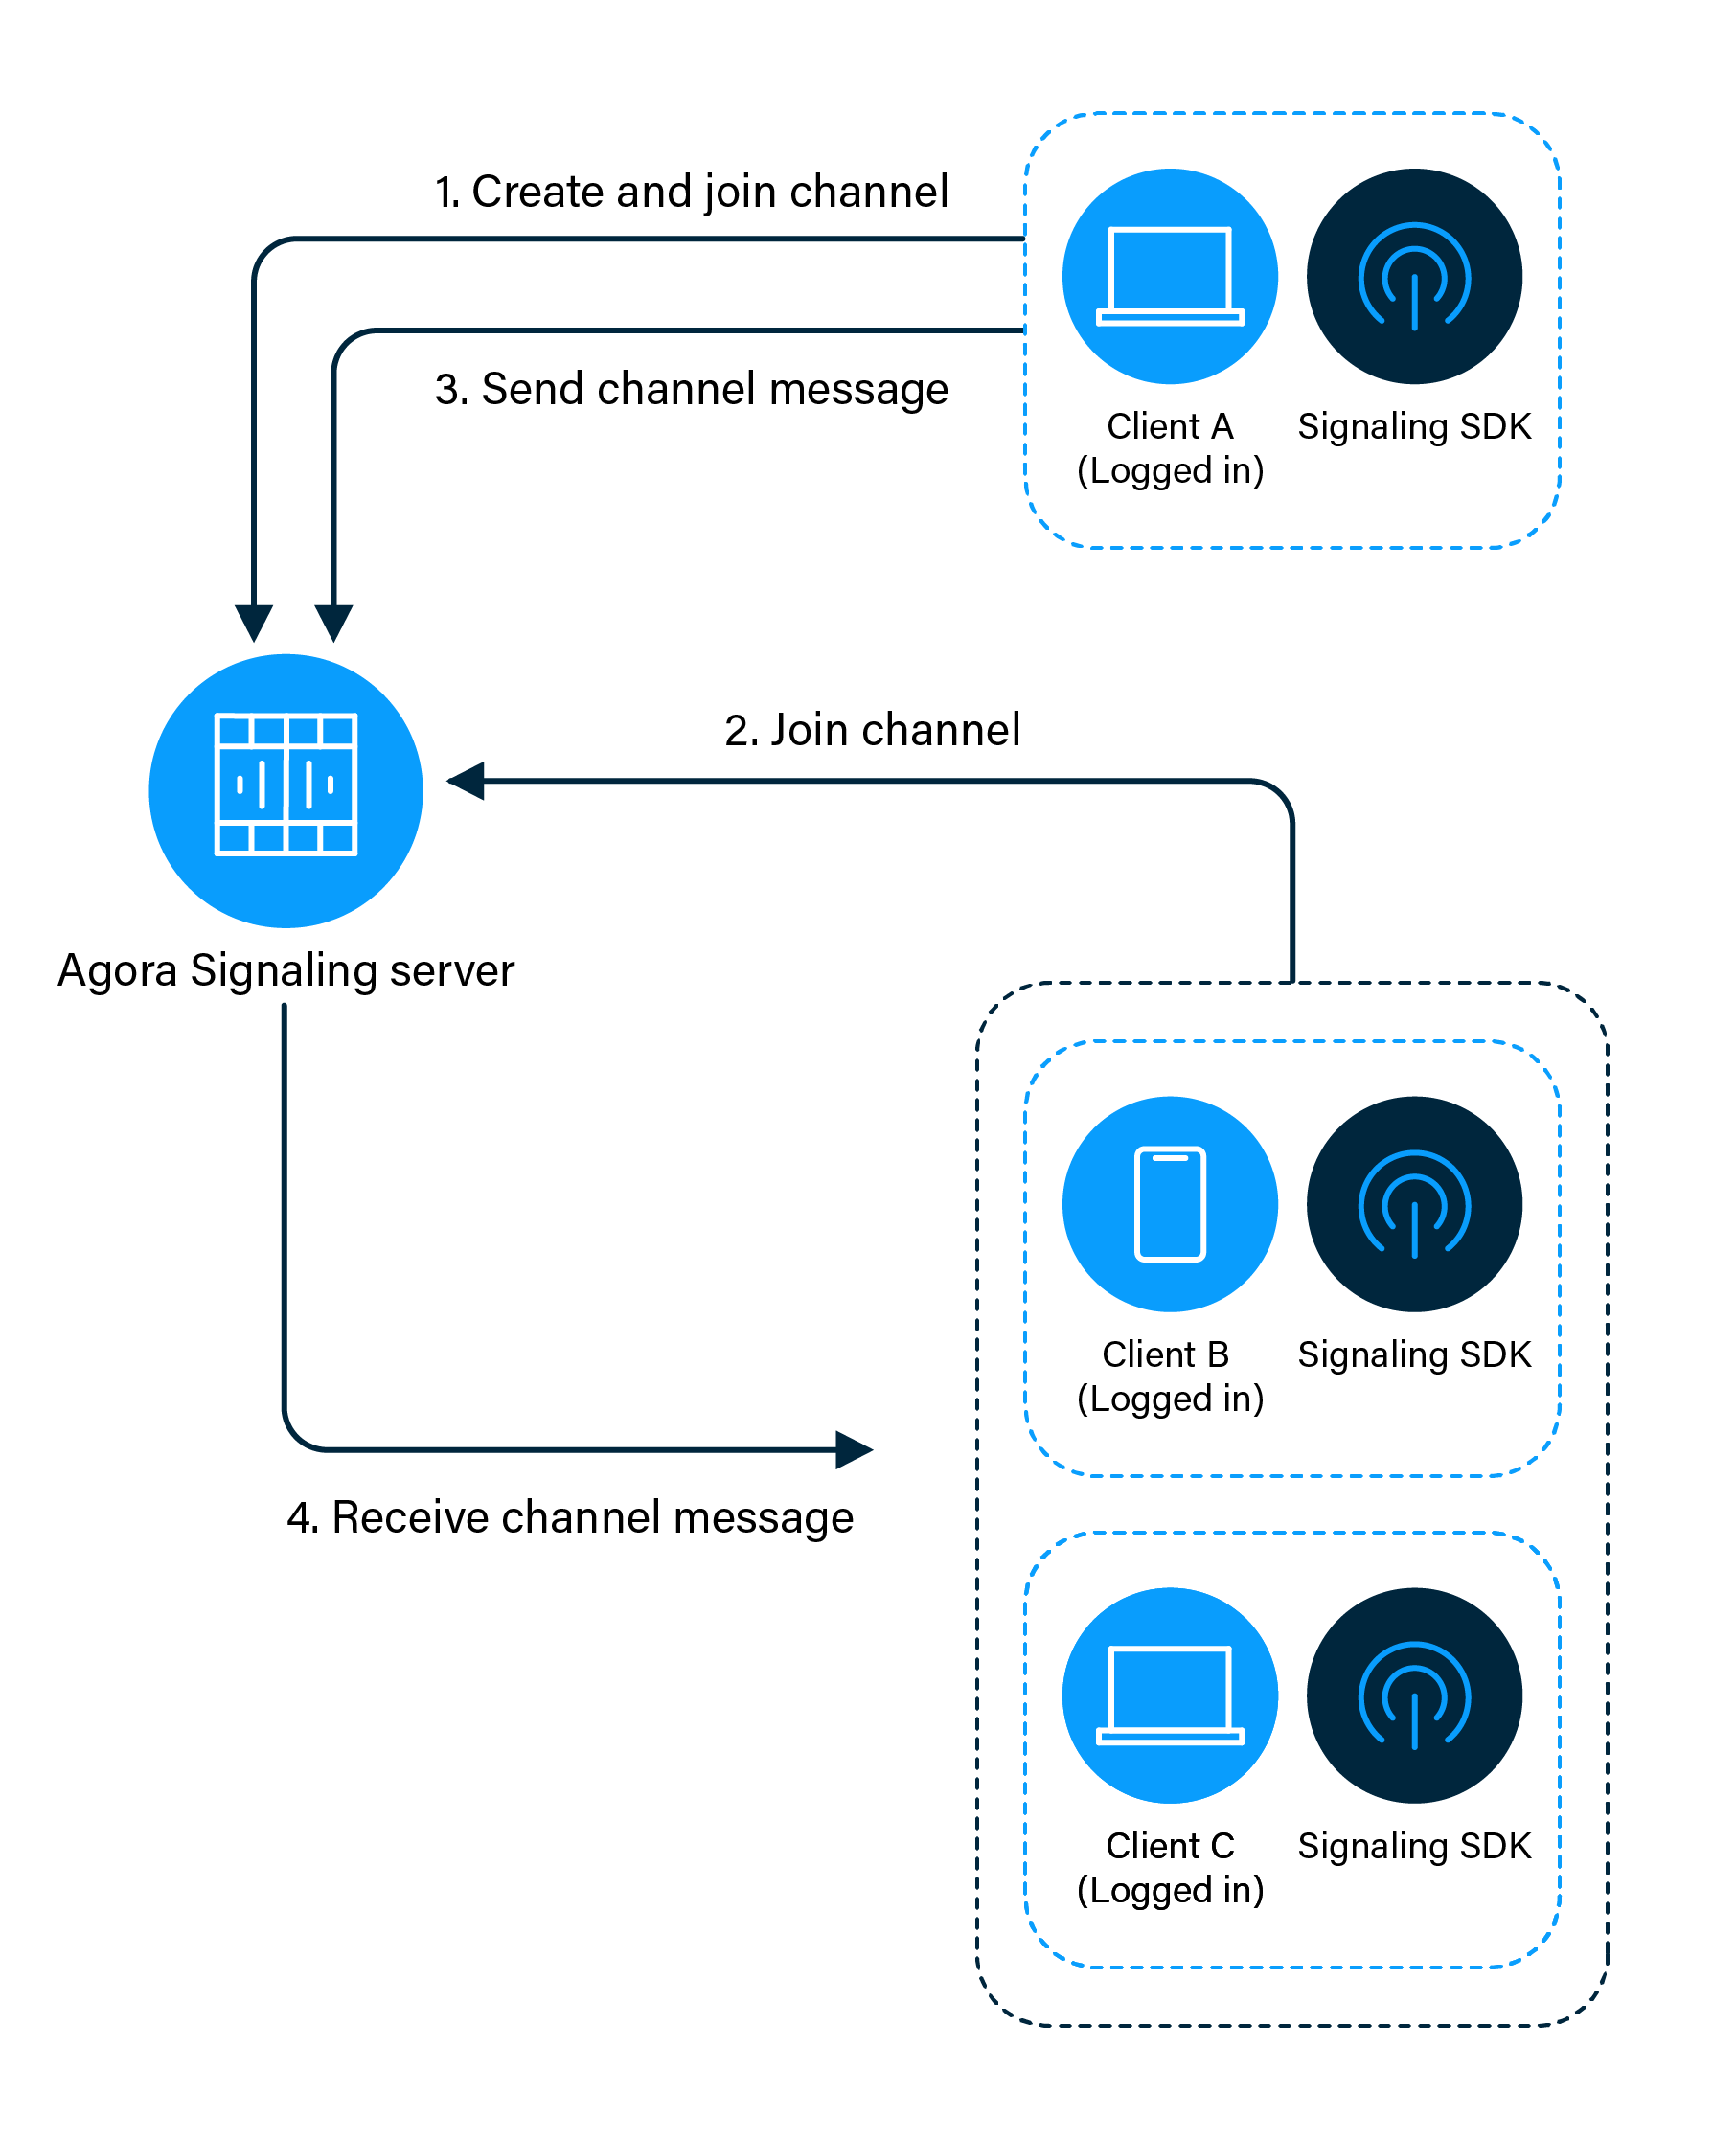
Channel messaging

The channel messaging process includes:
-
Client A creates a channel and join the channel.
-
Client B and client C joins the channel created by client A.
-
Client A sends a channel message to Signaling.
-
Signaling sends the channel message to client B and C. Client B and client C receives the message.
For an app client to join a channel, you need the following information:
-
The App ID: A randomly generated string provided by Agora for identifying your app. You can get the App ID from Agora Console.
-
The user ID: The unique identifier of a user. You need to specify the user ID yourself, and ensure that it is unique in the channel.
-
A token: In a test or production environment, your app client retrieves tokens from your server.
-
The channel name: A string that identifies the channel for the channel messaging.
Prerequisites
In order to follow this procedure you must have:
- Android Studio 4.1 or higher.
- Android SDK API Level 24 or higher.
- A mobile device that runs Android 4.1 or higher.
-
A computer with Internet access.
Ensure that no firewall is blocking your network communication.
Project setup
Follow the steps to create the environment necessary to add Signaling into your app.
1. Create an Android project
Use Android Studio to create an Android project.
-
Select the Project Template as Empty Activity.
-
Enter
RtmQuickstartas the Name. -
Enter
com.example.rtmquickstartas the Package name. -
Select Language as Java.
2. Add permissions
Add the following permissions in the AndroidManifest.xml file.
If your app targets Android 6.0 or higher, you need to dynamically apply for the above permissions, see Request app permissions for details.
If your app targets Android 10 or higher, refer to Privacy changes in Android 10.
3. Prevent code obfuscation
Add the following line in the app/proguard-rules.pro file to prevent code obfuscation:
If an error is reported, you can change the code as:
4. Integrate the SDK
Integrate the Agora Signaling Android SDK into your project with Maven Central. For more integration methods, see Other approaches to integrate the SDK.
-
In
/Gradle Scripts/build.gradle(Project: <projectname>), add the following lines to add the Maven Central dependency: -
In
/Gradle Scripts/build.gradle(Module: <projectname>.app), add the following lines to integrate the Agora Signaling Android SDK into your Android project:
Implement Signaling
This section shows how to use the Agora Signaling SDK to implement Signaling into your app step by step.
1. Implement the UI and resource files
To help you quickly understand and implement functions of Agora Signaling, this section shows how to implement the following functions in an Activity with minimum effort:
-
Log in to and log out of Agora Signaling
-
Join and leave a channel
-
Send and receive peer-to-peer or channel messages
-
See the changes in connection state of the user
-
Open the
app/res/layout/activity_main.xmlfile with Android Studio, edit it in Code mode, and replace the contents of the file with the following: -
Open the
app/res/values/strings.xmlfile and replace the contents of the file with the following:
-
You need to edit the following fields:
-
Replace
Your App IDwith the App ID of your project. -
Replace
Your Tokenwith the Token you obtained.
2. Implement the logic of sending and receiving messages
Open the app/java/com.example.rtmquickstart/MainActivity.java file and replace the contents of the file with the following:
Test your app
Build the project in Android Studio, and run it on a simulator or a physical mobile device. If the project runs successfully, you are able to:
-
Log in to and log out of Agora Signaling.
-
Join and leave a channel.
-
Send and receive peer-to-peer or channel messages.
-
See the changes in the connection state of the user and changes in the channel state.
You can see the following page if your project runs successfully:
Considerations
-
The Agora Signaling SDK supports creating multiple RtmClient instances that are independent of each other.
-
To send and receive peer-to-peer or channel messages, ensure that you have successfully logged in the Agora Signaling (you have received onSuccessonSuccess.
-
To use any of the channel features, you must first call the createChannel method to create a channel instance.
-
You can create multiple channel instances for each RtmClient instance, but you can only join a maximum of 20 channels at the same time. The
channelIdparameter needs to be channel-specific. -
When you leave a channel and do not want to join it again, you can call the release method to release all resources used by the channel instance.
-
You cannot reuse a received RtmMessage instance.
Next steps
Generating a token by hand is not helpful in a production context. Authenticate Your Users with Tokens shows you how to start Signaling with a token that you retrieve from your server.
See also
Sample project
Agora also provides an open-source [sample project](https://github.com/AgoraIO/Signaling/tree/master/Agora-Signaling-Tutorial-Android) on GitHub for your reference.
Other approaches to integrate the SDK
Downloads shows you alternative ways to add Signaling SDK in your project.
Next steps
Generating a token by hand is not helpful in a production context. Authenticate Your Users with Tokens shows you how to start live streaming with a token that you retrieve from your server.